Images are everywhere, but useful text is still what makes them searchable, reusable, and easier to work with. That is why a tool like AI image describer has become more practical than many people expect. It does not just look at a picture and list a few visible objects. It helps turn an image into a description, a caption, a prompt, a marketing angle, or a clearer explanation of what is happening in the frame.
画像はあらゆるところにありますが、それらを検索可能にし、再利用しやすくし、扱いやすくしているのは、今でも「役に立つテキスト」です。だからこそ、AI image describer のようなツールは、多くの人が想像する以上に実用的な存在になっています。ただ画像を見て、目に見える物体をいくつか挙げるだけではありません。画像を、説明文やキャプション、プロンプト、マーケティングの切り口、あるいはフレーム内で起きていることをよりわかりやすく示す解説へと変換する手助けをしてくれます。
For creators, sellers, students, marketers, and everyday users, that is a real advantage. Instead of staring at an image and trying to manually explain it, you can upload it, choose the type of output you need, and get usable text in seconds. Better still, you can then take that text into other creative tools, whether you want to write social content, build a product listing, generate a prompt, or improve visual notes.
クリエイター、販売者、学生、マーケター、一般ユーザーにとって、これは大きな利点です。画像を見つめながら、手作業で説明文をひねり出す代わりに、画像をアップロードし、必要な出力タイプを選ぶだけで、数秒で使えるテキストが得られます。さらに、そのテキストを別のクリエイティブツールに持ち込んで、SNS投稿を書いたり、商品ページを作成したり、プロンプトを生成したり、ビジュアルノートを改善したりすることもできます。
This guide explains what the tool does, where it is most useful, how to get better results from it, and which other free tools on Flux Pro Web are worth trying next.
このガイドでは、このツールの機能、特に役立つ場面、よりよい結果を得るための使い方、そして次に試す価値のある Flux Pro Web 上の他の無料ツールについて説明します。
What image description really means today
いま「画像説明」が本当に意味するもの
A lot of people still think image description is just object recognition. In the past, that often meant a system could say “dog,” “car,” or “tree,” but not much more. Modern AI image description tools are much more useful because they can describe the scene in a way that actually helps a human being.
多くの人はいまだに、画像説明とは単なる物体認識だと考えています。かつては「犬」「車」「木」といったラベルを出せる程度で、それ以上のことはできないシステムがほとんどでした。現代のAI image description ツールは、人間にとって本当に役立つ形でシーン全体を描写できるため、はるかに実用的です。
That means the output can include the setting, the arrangement of objects, the tone of the image, the likely purpose of the photo, visible actions, and the kinds of details that matter in real content work. If the image is a product photo, the description can help you build product copy. If it is a lifestyle image, it can help with caption writing. If it is a reference image, it can help turn visual ideas into generation prompts.
つまり出力には、背景となるシチュエーション、物体の配置、画像全体のトーン、写真の狙いとして考えられる目的、目に見える動き、実際のコンテンツ制作で重要になるような細部まで含めることができます。画像が商品写真なら、その説明は商品説明文を作る助けになります。ライフスタイル写真なら、キャプション作成に役立ちます。参考用画像であれば、そこからビジュアルアイデアを生成用プロンプトへと変換する手助けをしてくれます。
In other words, image description now sits between visual understanding and text creation. It helps bridge the gap between seeing an image and doing something useful with it.
言い換えると、画像説明は「ビジュアルの理解」と「テキスト生成」の中間に位置するようになりました。画像を「見る」ことと、その画像を使って何か有用なアウトプットを生み出すこととの間のギャップを埋めてくれるのです。
What the Flux Pro Web tool can do
Flux Pro Web のツールでできること
The strength of this AI image description generator is that it is not limited to a single output style. Instead of forcing every image into one type of answer, it gives users several modes that match different goals.
このAI image description generator の強みは、出力スタイルが 1 種類に限定されていないことです。すべての画像を同じ形式の答えに押し込むのではなく、目的に合わせて選べる複数のモードを用意しています。
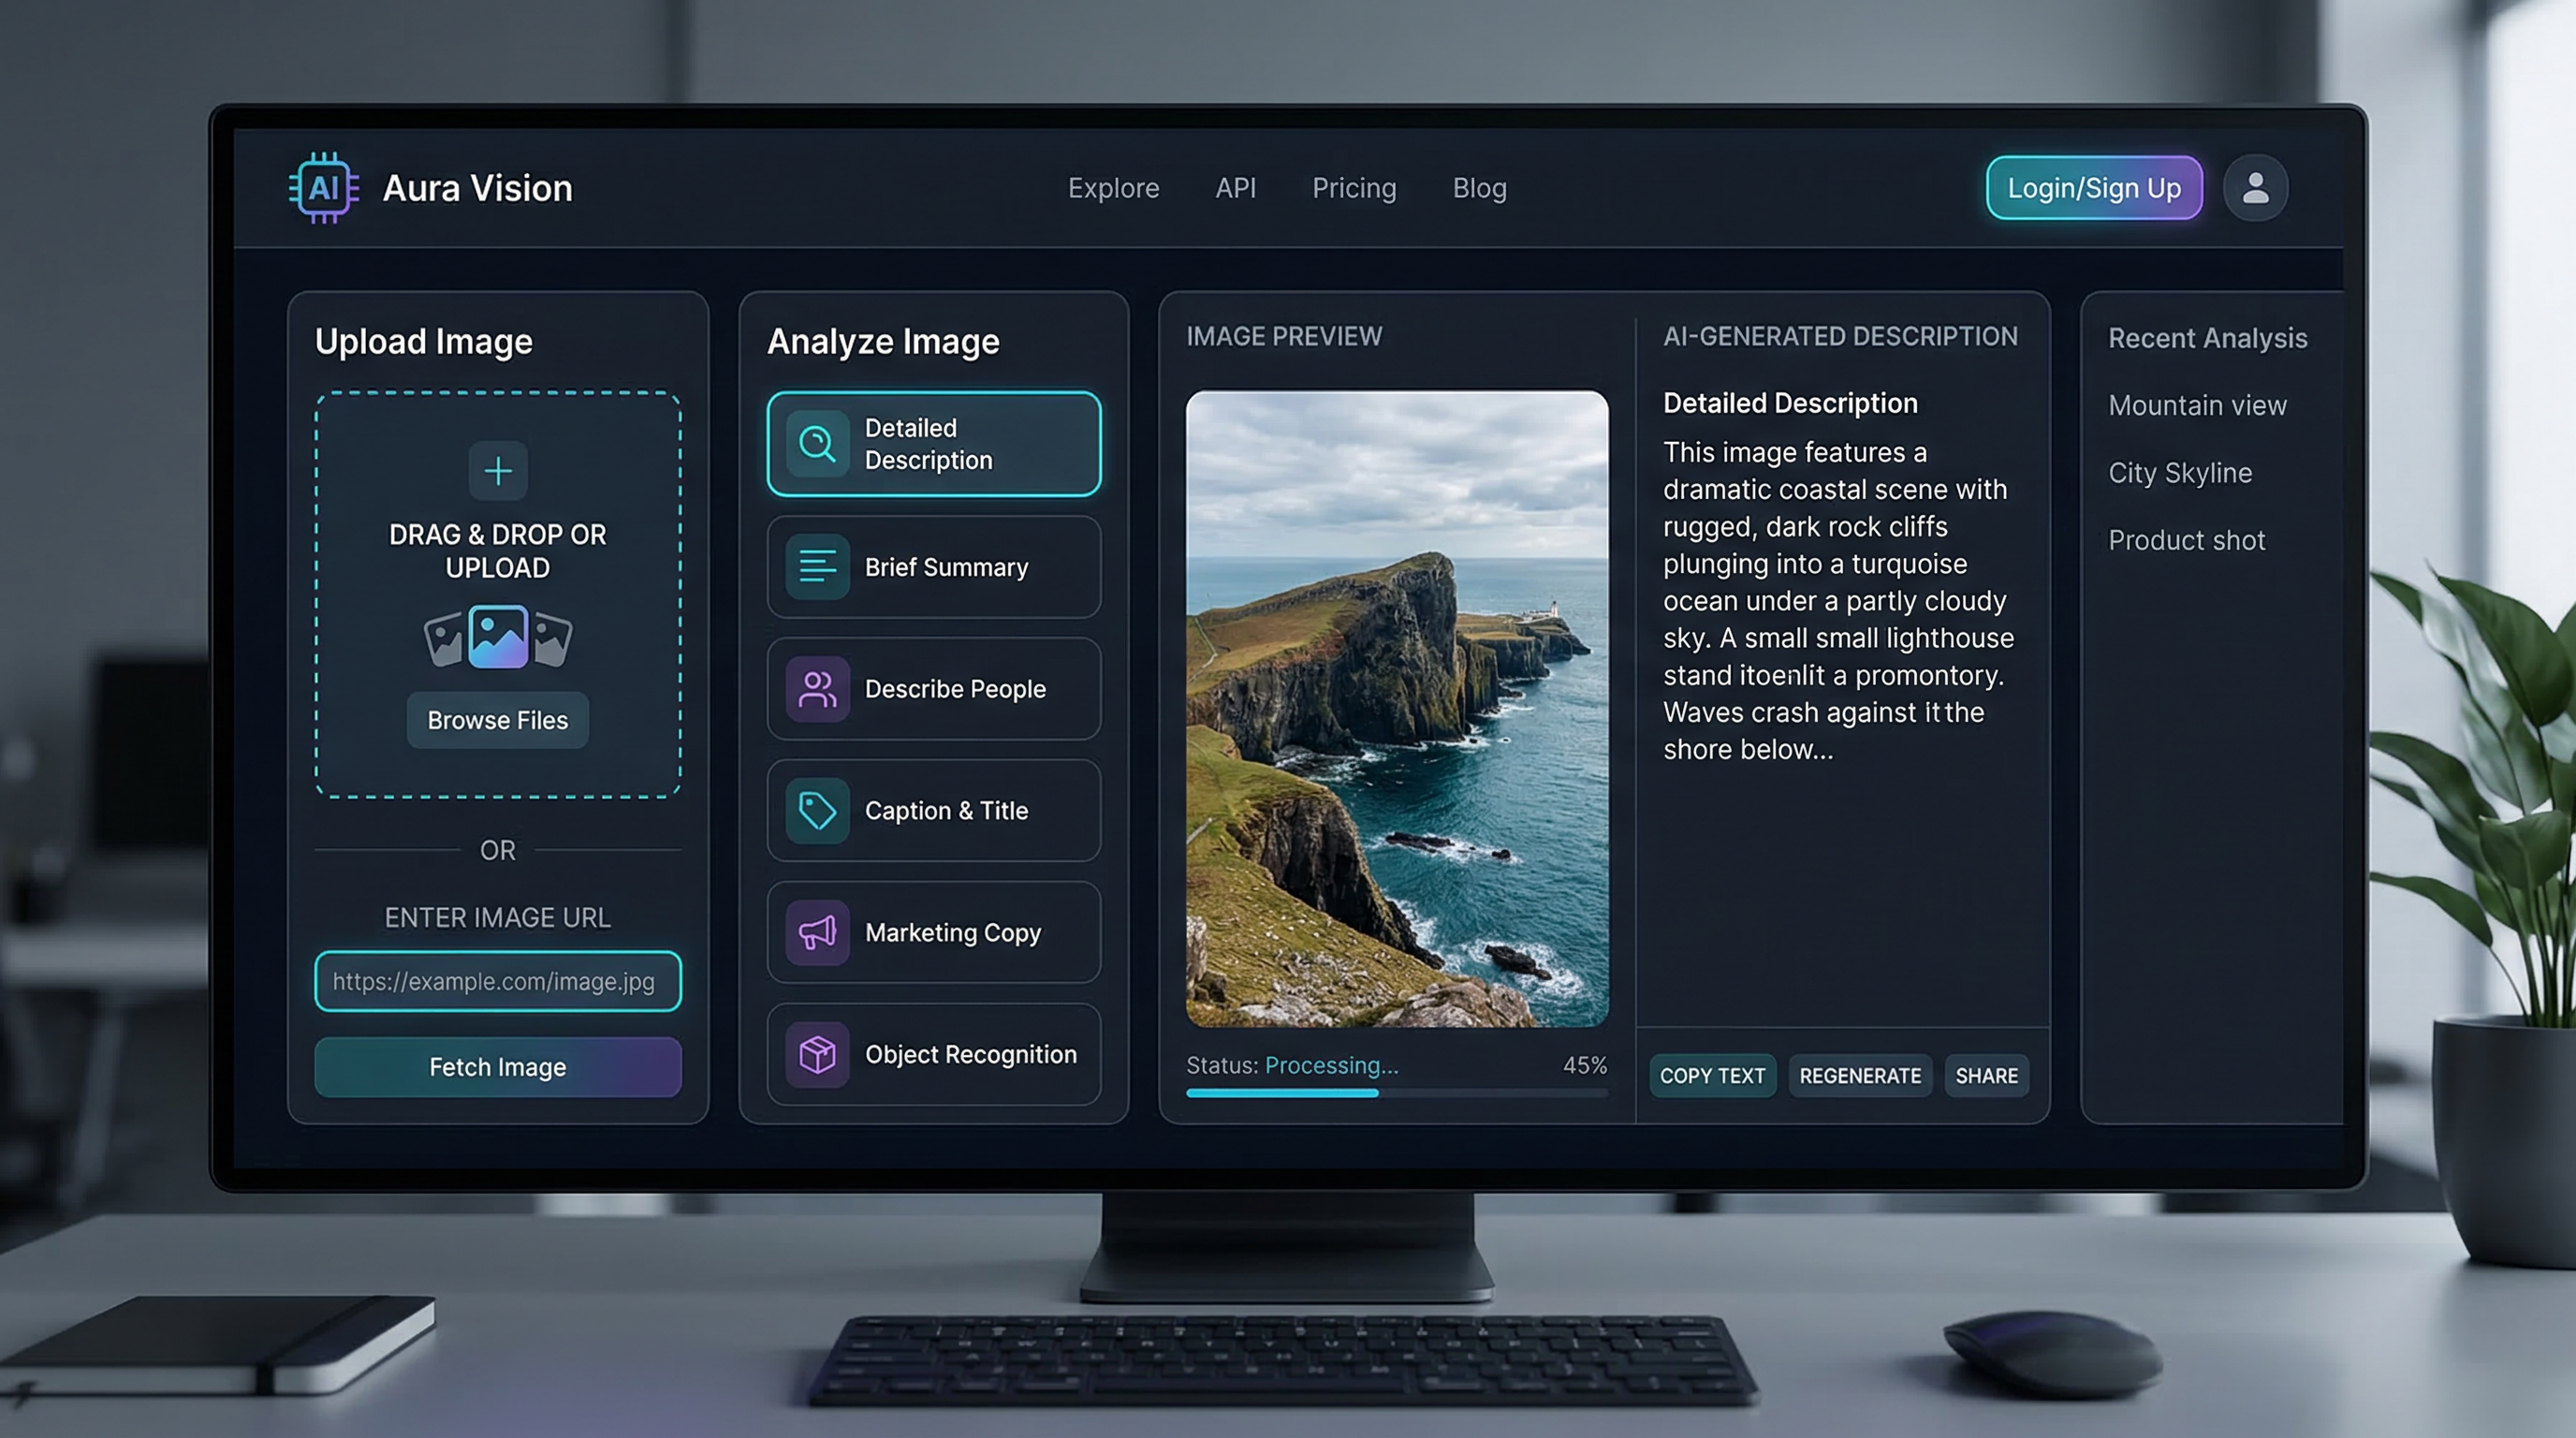
A detailed description mode is useful when you want a fuller explanation of the image, including objects, layout, visual relationships, and general atmosphere. A brief description mode is better when you want a fast summary without too much extra detail. A people-focused option is useful for describing visible features, poses, clothing, or interactions in images where human subjects matter. Caption title mode helps users quickly turn an image into something social-friendly or headline-ready. Marketing copy mode is especially practical for sellers, advertisers, or content teams that want a promotional angle instead of neutral analysis. Object recognition is the more direct identification mode, while a custom question field gives the tool extra flexibility.
詳細説明モードは、画像内の物体、レイアウト、視覚的な関係性、全体の雰囲気などを含めて、より丁寧に説明したいときに役立ちます。簡易説明モードは、余計な情報を加えずに、素早く概要をつかみたい場面に向いています。人物特化オプションは、人が主役となる画像において、見た目の特徴、ポーズ、服装、相互作用などを描写するのに便利です。キャプション(タイトル)モードは、画像をすぐに SNS 向けや見出し向けのテキストへと変換したいときに役立ちます。マーケティングコピー・モードは、中立的な分析ではなく「宣伝寄りの切り口」がほしい販売者、広告担当者、コンテンツチームにとって特に実用的です。オブジェクト認識モードは、よりストレートに対象物を識別するモードであり、カスタム質問欄を使えば、さらに柔軟な出力を引き出せます。
That combination makes it more practical than a basic recognition tool. It is not just telling you what is in the image. It is helping you decide what kind of text you need from the image.
これらを組み合わせることで、単なる認識ツール以上に実務的なツールになります。画像の中身を教えるだけでなく、「その画像からどのようなテキストが必要なのか」を決める手助けをしてくれるのです。
How to use the tool step by step
ツールの使い方ステップガイド
Using the tool is straightforward, which is part of its appeal. Most users will only need a minute or two to understand the workflow.
このツールの魅力のひとつは、「使い方がわかりやすい」ことです。ほとんどのユーザーは、ワークフローを理解するのに 1~2 分もかかりません。
Start by uploading an image or pasting an image URL. That makes it easy to work with both local files and online references. Next, choose the output mode that best matches your goal. This step matters more than many people think. If you want a social media result, a caption-focused output may be more useful than a detailed scene breakdown. If you want to learn from a reference image, a longer descriptive output will usually help more.
まず、画像ファイルをアップロードするか、画像 URL を貼り付けます。これで、手元のファイルでもオンライン上の参照画像でも簡単に扱えます。次に、自分の目的に最も合った出力モードを選びます。このステップは、多くの人が思う以上に重要です。SNS 用のテキストがほしいなら、細かなシーンの分解よりも、キャプションに特化した出力のほうが役立つ場合があります。参考画像から学びを得たいなら、より長めで説明的な出力のほうが、たいてい役に立ちます。
After that, choose your language and generate the result. Once the text appears, you can copy it directly, refine it, or use it as input for other tools.
その後、使用したい言語を選び、結果を生成します。テキストが表示されたら、そのままコピーして使うことも、内容を手直しすることも、別のツールへの入力として利用することもできます。
A good beginner workflow is simple: start with a detailed description, then try the same image in caption mode or marketing mode. That lets you see how different output types can turn one image into different kinds of usable content.
初心者におすすめのワークフローはシンプルです。まず詳細説明モードで出力し、次に同じ画像をキャプションモードやマーケティングモードでも試してみてください。1 枚の画像からでも、出力タイプを変えるだけでまったく異なる種類のコンテンツを作れることが体感できます。
Best use cases for an image describer
画像説明ツールが特に活きる活用シーン
The most obvious use case is caption writing. Many people have a good image but do not know how to describe it in a clean, appealing way. A strong AI image describer can give you a starting point much faster than writing from scratch.
もっともわかりやすい用途は、キャプション作成です。「良い写真はあるけれど、それをうまく、魅力的に表現する言葉が出てこない」という人は多くいます。高性能なAI image describer を使えば、ゼロから考えるよりずっと早く「たたき台」となる文章を得られます。
Another strong use case is product content. If you sell online, manage listings, or create catalog pages, a good image description can help you turn a plain visual into more informative product copy. That is especially useful when you need multiple variations for marketplaces, store pages, or ad creatives.
もう一つの代表的な用途は、商品用コンテンツです。オンライン販売、商品リスティングの管理、カタログページの作成などをしているなら、良質な画像説明は、ただのビジュアルを「情報量のある商品説明文」へと変える助けになります。特に、マーケットプレイスや自社ストア、広告クリエイティブなど、複数パターンの文面が必要なときに有効です。
It is also useful for creative prompt building. A lot of users already understand that a good image can inspire another image, but they struggle to convert what they see into prompt language. A description tool can act like a translator between visual inspiration and prompt structure.
クリエイティブ用のプロンプト作成にも役立ちます。良い画像が、別の画像制作のインスピレーションになることを理解しているユーザーは多い一方で、「目で見ているものをプロンプトの言葉に変換する」部分でつまずきがちです。画像説明ツールは、ビジュアルから得たひらめきと、プロンプトとしての文章構造をつなぐ「翻訳者」のような役割を果たします。
Accessibility is another reason these tools matter. Even when users are not writing formal alt text, being able to summarize an image clearly can support more accessible communication. Students, researchers, and content teams can also use image description for quick note-taking, reference tagging, or visual analysis.
アクセシビリティの観点からも、この種のツールは重要です。正式な alt テキストを書かない場合でも、画像をわかりやすく要約できることは、情報へのアクセスを広げるコミュニケーションにつながります。学生や研究者、コンテンツチームは、画像説明を素早いメモ取り、資料タグ付け、ビジュアル分析などにも利用できます。
Then there is idea extraction. Sometimes the real value of an image is not the image itself, but the concept behind it. A description can help isolate that concept quickly.
さらに「アイデア抽出」にも活用できます。画像の真の価値が、見た目そのものではなく、その背後にあるコンセプトにあることも少なくありません。説明文として言語化することで、そのコンセプトを素早く切り出せます。
How to get better results
よりよい結果を得るためのコツ
The easiest way to improve results is to choose the right mode before you click generate. A generic output is not always bad, but a better-matched mode usually produces better text. If your goal is a product pitch, use marketing copy. If your goal is understanding visual details, use detailed description. If your goal is prompt creation later, start with the richest descriptive mode you can.
結果を改善する最も簡単な方法は、「生成」ボタンを押す前に適切なモードを選ぶことです。汎用的な出力が必ずしも悪いわけではありませんが、目的に合ったモードを選んだほうが、たいてい質の高いテキストになります。商品訴求が目的ならマーケティングコピーを、ビジュアルの細部を理解したいなら詳細説明を、後でプロンプト作成に使いたいなら、できるだけ情報量の多い説明モードから始めましょう。
Image quality matters too. Clear, well-lit, well-framed images are easier to describe accurately than cluttered, blurry, or heavily compressed ones. If the image contains many small elements, crop or simplify it first when possible.
画像のクオリティも重要です。明るく、ピントが合い、構図がはっきりした画像のほうが、ごちゃついていたり、ぼやけていたり、強く圧縮されている画像よりも、正確に説明しやすくなります。小さな要素が大量に含まれている場合は、可能であれば事前にトリミングするなどして、対象を絞っておくとよいでしょう。
Custom questions can also make a big difference. Instead of asking the tool to describe everything, ask a more purposeful question. What is the main object? What is the mood of this image? What kind of product audience does this photo suggest? What would make a good short caption for this visual? Specific questions often produce more useful outputs than broad ones.
カスタム質問の活用も大きな効果を生みます。「画像のすべてを説明して」と丸投げするのではなく、もっと目的のはっきりした問いを投げてみてください。「主役となる対象は何か?」「この画像の雰囲気(ムード)は?」「この写真はどのようなターゲット層の商品向けに見えるか?」「このビジュアルに合う短いキャプションは?」といった具合です。漠然とした質問よりも、目的を限定した質問のほうが、実務に使いやすい出力になりやすい傾向があります。
Finally, treat the output as a first draft, not a final verdict. The best use of an AI image description workflow is often to speed up thinking, not replace it entirely. Edit the result so it matches your voice, your brand, or your intended platform.
最後に、出力結果は「最終版」ではなく「初稿」として扱うようにしましょう。AI image description ワークフローの本当の価値は、多くの場合、「考えるスピードを上げること」にあり、「考えること自体を手放すこと」ではありません。自分やブランドの文体、投稿先のプラットフォームに合わせて、内容を整えて使うのがおすすめです。
Why this is more practical than basic image recognition
なぜ単なる画像認識より実用的なのか
Basic image recognition is helpful when you only need identification. But many users need more than that. They need text that can move into another workflow.
基本的な画像認識は、「何が写っているかを識別できれば十分」という場面では有用です。しかし、多くのユーザーが本当に必要としているのは、その一歩先です。別のワークフローにそのまま乗せられるテキストが求められています。
That is why a proper AI image description generator is more useful for creators and businesses. It can support analysis, but it can also support action. You can turn a description into a prompt, a post caption, a product blurb, a visual note, or a content draft.
だからこそ、本格的なAI image description generator は、クリエイターやビジネスユーザーにとってより価値の高いツールになります。分析を支えるだけでなく、「次のアクション」を支えることができるからです。説明文はそのまま、プロンプト、投稿キャプション、商品説明の一文、ビジュアルノート、コンテンツの下書きへと転用できます。
This is where the tool becomes more than a novelty. It becomes a bridge between understanding an image and creating with it.
ここまでくると、このツールは「面白いおもちゃ」を超えた存在になります。画像を理解することと、その画像を使って何かを創り出すことの間をつなぐ「橋」のような役割を果たすのです。
Other free Flux Pro Web tools worth using next
次に試す価値のある、その他の Flux Pro Web 無料ツール
One of the best things about using this kind of tool on Flux Pro Web is that it naturally connects to other free workflows.
Flux Pro Web 上でこの種のツールを使う利点のひとつは、他の無料ワークフローと自然につながっていくことです。
If you want to turn a visual reference into better generation instructions, try Image to Prompt. It is the most natural follow-up when you want to move from description into image creation.
ビジュアルの参考素材から、より精度の高い生成指示を作りたい場合は、Image to Prompt を試してみてください。説明フェーズから画像生成フェーズへ移りたいとき、最も自然な次のステップになります。
If the image itself needs cleanup before reuse, Background Remover is a practical next step. It can help isolate products, people, or design elements for cleaner outputs.
画像を再利用する前にクリーンアップが必要な場合は、Background Remover が実用的な選択肢です。商品や人物、デザイン要素などを背景から切り離し、よりスッキリした素材に整えることができます。
If the description gives you a concept but you still need a stronger prompt, Flux AI Prompt Generator can help turn rough ideas into more structured prompt language.
説明からコンセプトはつかめたものの、まだプロンプトとしての整理が必要な場合は、Flux AI Prompt Generator を使うことで、大まかなアイデアを構造のあるプロンプト言語へと整えられます。
If the image is too small or too soft for reuse, Free Image Upscaler is another useful companion tool. And if you need to prepare files for publishing, editing, or sharing, Flux Image Format Converter helps make that step easier.
再利用するには画像が小さすぎる、あるいはぼやけすぎている場合には、Free Image Upscaler が心強い相棒になります。また、公開・編集・共有のためにファイル形式を整える必要があるなら、Flux Image Format Converter を使うことで、そのステップをスムーズに進められます。
The smoothest workflow is often simple: describe first, then refine, convert, enhance, or prompt from there.
最もスムーズなワークフローは、多くの場合とてもシンプルです。まず「説明」から始め、それを基点に「整える」「変換する」「高画質化する」「プロンプト化する」といった処理につなげていきます。
FAQ
よくある質問(FAQ)
What is the difference between image recognition and image description?
画像認識と画像説明の違いは何ですか?
Image recognition mainly identifies visible elements. Image description goes further by explaining the scene, relationships, mood, or likely purpose of the image in natural language.
画像認識は主に、目に見える要素を識別することに特化しています。画像説明はその先まで踏み込み、シーン全体の様子、要素同士の関係性、雰囲気、画像の用途として考えられる目的などを自然な文章で説明します。
When should I use an image describer instead of an image generator?
画像生成ツールではなく、画像説明ツールを使うべきなのはどんなときですか?
Use a describer when you already have an image and want to understand it, summarize it, caption it, or turn it into usable text. Use a generator when you want to create a new image from text.
すでに画像を持っていて、それを理解したい・要約したい・キャプションを付けたい・テキストとして活用したいときには、説明ツールを使いましょう。テキストから新しい画像を作りたいときには、生成ツールを使うのが適しています。
Can this tool help me write prompts?
このツールはプロンプト作成の助けになりますか?
Yes. A good description can become raw material for prompt writing, especially if you combine it with a prompt-focused tool afterward.
はい。良質な説明文はプロンプト作成の素材として活用できます。特に、その後でプロンプト専用ツールと組み合わせる場合に威力を発揮します。
Is it useful for product photos?
商品写真にも役立ちますか?
Very much so. Product visuals are one of the best use cases because the output can help with copywriting, listing support, tags, and marketing angles.
大いに役立ちます。商品画像は、このツールの代表的な活用シーンのひとつです。出力されたテキストは、コピーライティング、商品ページ作成の補助、タグ付け、マーケティングの切り口作りなどに活かせます。
What kind of custom questions work best?
どのようなカスタム質問が効果的ですか?
Questions with a clear purpose usually work best. Ask about mood, product positioning, likely caption angles, main objects, or useful prompt details.
目的が明確な質問が、最も効果を発揮します。たとえば「画像のムード」「商品としてのポジショニング」「キャプションの方向性」「主役となる対象」「プロンプトに入れるべき要素」などを尋ねるとよいでしょう。
Final takeaway
まとめ
A free image describer is one of the most underrated AI utilities right now because it solves a very practical problem: turning visuals into usable text. That text can then power captions, prompts, listings, notes, or creative ideas.
無料の画像説明ツールは、「過小評価されている AI ツール」の代表格と言えます。その理由は、とても実務的な課題――ビジュアルを「使えるテキスト」に変換する――を解決してくれるからです。そのテキストは、キャプション、プロンプト、商品リスト、メモ、クリエイティブなアイデアなど、さまざまな用途の原動力になります。
If you want a simple starting point, AI image description on Flux Pro Web is a smart place to begin. It is flexible enough for everyday users and practical enough for content creators, marketers, and sellers. Even better, it fits naturally into a wider set of free tools on the same website, which makes the whole workflow feel more connected.
手軽な入り口を探しているなら、Flux Pro Web の AI image description から始めるのがおすすめです。日常的な利用にも十分柔軟に対応でき、コンテンツ制作者やマーケター、販売者にとっても実務レベルで使える設計になっています。同じサイト上の他の無料ツールとも自然につながるため、ワークフロー全体が一体感のある体験になります。
The real value is not just that the tool can describe an image. It is that the description can become your next step.
このツールの真価は、単に画像を説明できることではありません。その説明文を、そのまま「次の一手」に変えられることにあります。
Related Articles
関連記事
- Master FluxPro Image to Prompt Tool
- Convert Images to Prompts Instantly with FluxPro's AI Tool
- How to Edit Images with Flux Kontext AI: The Smarter Way to Transform Photos
People Also Read
あわせて読まれている記事
- Seedream 5.0 AI Image Editor Guide on HeyDream AI (2026)
- Exploring HiDream I1 AI Image Generation: Models, Usage, and Recommended Use Cases
- Seedream 5.0 Lite vs Seedream 4.5 on DreamMachineAI: Practical Differences and Best Workflows
- Nano Banana Pro on DreamMachine AI: A Practical Way to Create Better AI Images
- VideoWeb AI Image Generator 2026: The Creator Switchboard for Fast-to-Final Images
- How to Use Nano Banana 2 for AI Image Generation and Editing
- The Flux AI Image Generator Guide 2026: Best Models Compared & How to Use
- Introduction to the Image to Prompt Generator by Flux AI
- How to Use Sea Imagine AI’s Image Generator: A Beginner-Friendly Tutorial
- The Seedream 5.0 AI Image-to-Image Analysis Guide 2026