You’ve got two files on your desktop: a character image you love, and a reference video with the exact movement you want. The only question is: which tool will turn that combo into a convincing clip without turning your character’s hands into spaghetti?
This guide compares Kling Motion Control and Wan Animate in the way creators actually use them: motion transfer, character animation, and (when you need it) clean character replacement inside existing footage. By the end, you’ll know which model to pick, how to set it up, and what to type so you get a usable result on your first few tries.
If you’re here for the quick verdict, start here:
- If your goal is motion mimic (dance, gestures, acting beats), Kling usually feels like the more direct tool.
- If your goal is character replacement (swap someone in an existing video while keeping the scene), Wan tends to be the better fit.
Let’s start by looking at Kling 2.6 Motion Control vs Wan 2.2 Animate for a quick side-by-side—then we’ll dig into what each tool is.
The 20‑second decision (pick your outcome, not your brand)
Use this as your “don’t overthink it” guide:
- Choose Kling when you want your image subject to copy the motion from a performer video: dancing, walking, waving, fighting poses, body language.
- Choose Wan when you want to replace a person in a real scene with your character, especially if you care about preserving the original camera movement and background.
What these tools are, in plain English
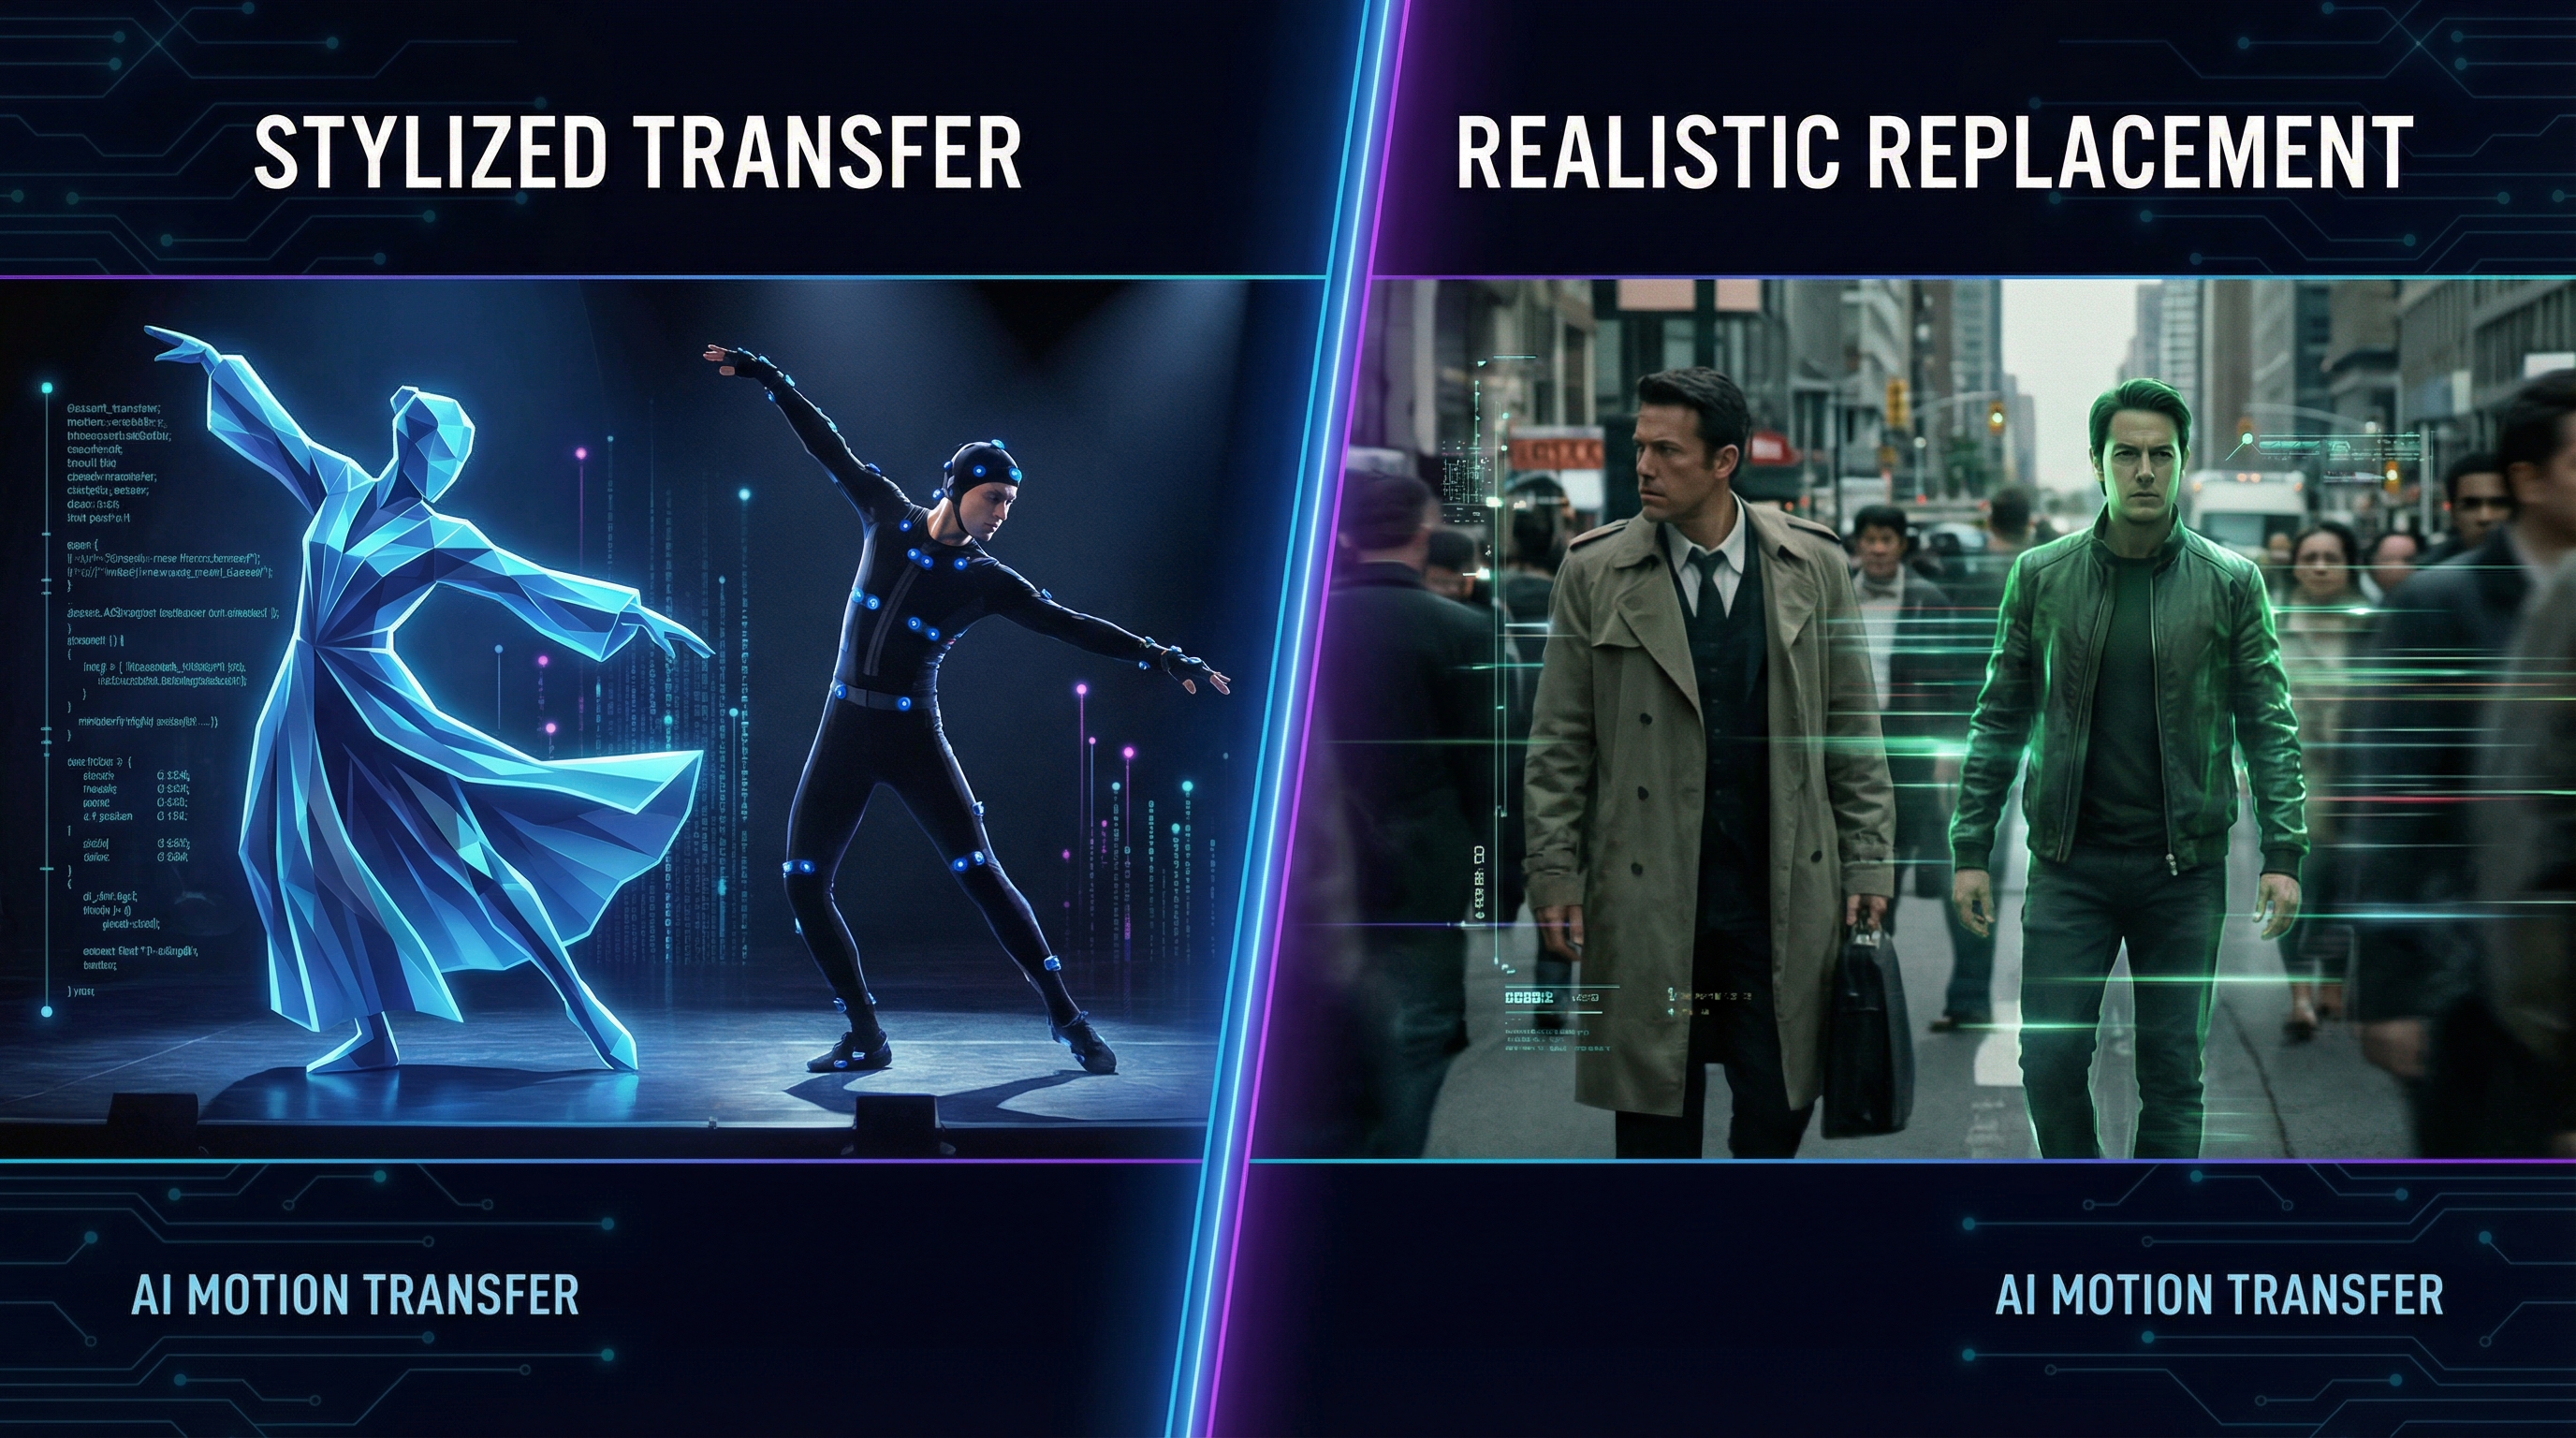
What is Kling 2.6 Motion Control?
If you’re new, What Is Kling 2.6 Motion Control in one sentence: it’s a motion-transfer workflow where the main subject in your image mimics the movement from your uploaded reference video.
That design choice matters. Kling is fundamentally about motion: the reference video is the “performance,” and your image is the “actor.” Your prompt mostly sets the styling and scene framing, not the choreography.
Best when:
- You want performance transfer: dance, acting beats, gestures
- Your subject is clearly visible in the image (ideally full‑body or at least upper body)
- You want quick iterations on “the same move, different character/style”
What is Wan 2.2 Animate?
In one sentence, What Is Wan 2.2 Animate: it’s a character animation tool that can either animate your character from a reference clip or replace a character inside existing video depending on the mode.
That “mode” part is the big deal. Wan is the one you reach for when your output needs to look like it belongs in a specific shot: same camera drift, same scene, but a different character.
Best when:
- You want a swap: keep scene, replace the actor
- You want to preserve the original shot’s vibe
- You care about continuity with real footage
Kling vs Wan in real workflows
Most comparisons about Wan 2.2 Animate vs Kling Motion Control stay abstract. Let’s keep it practical.
Inputs you’ll usually use
Both workflows generally revolve around the same three ingredients:
- Video upload (your motion reference/performer/scene)
- Image upload (your target character)
- Prompt (style + guardrails)
The difference is what each tool prioritizes.
- Kling prioritizes motion fidelity to the reference clip.
- Wan prioritizes shot continuity, especially in replacement-style outputs.
In practice, choosing between the two comes down to intent: if you want the cleanest possible performance transfer, Kling often feels more straightforward, while Wan shines when that performance needs to stay grounded in an existing shot.
How to use Kling 2.6 Motion Control (a beginner-proof walkthrough)
If you want the official entry point first, here’s the link: How to Use Kling 2.6 Motion Control.
Now let’s make it actually usable.
Step 1: Pick a motion reference that’s easy to read
The fastest way to get a strong Kling result is to choose a reference video where:
- The performer is large in frame
- The limbs aren’t constantly occluded
- The camera isn’t whipping around
A clean, centered TikTok dance clip will usually beat a chaotic handheld action scene.
Step 2: Choose an image that matches the type of motion
If your motion clip is full‑body dancing, use a full‑body image. If it’s a talking head with subtle gestures, use a clear upper‑body portrait.
Consistency wins.
Step 3: Upload in the order that matches your thinking
Kling’s UI encourages: upload motion video → upload image.
You’re basically telling the model: “This movement, on this subject.”
Step 4: Prompt for style and context, not choreography
Kling already has the choreography from the reference clip. Your prompt is for:
- art style (cinematic, anime, stylized, realistic)
- environment (street, stage, studio)
- camera language (medium shot, full body, steady)
- quality guardrails (sharp, stable, coherent anatomy)
If you want to go deeper, the rest of this section walks you through Kling step by step, with examples you can apply immediately.
Kling 2.6 Motion Control settings that matter
Here’s the practical version of Kling 2.6 Motion Control Settings—what you actually touch first.
Resolution
- Start at a lower resolution for testing.
- Once you like the motion and identity, rerun at higher resolution.
Clip length
Shorter clips are easier to stabilize. If you can make the moment work in 5–8 seconds, you can always stitch later.
Version / mode selection
If you see options like “STD” vs others, treat STD as your default baseline unless you know you need a special mode.
Kling motion control prompt guide (with copy-paste templates)
If you only read one section, read this one. Your prompt can make the difference between “wow” and “why does the face melt.”
Here’s a creator-friendly Kling Motion Control Prompt Guide you can actually use.
The simple prompt formula
Subject + style + environment + camera + lighting + quality guardrails
Template 1: Clean dance transfer
Full-body character performing the reference motion, stable proportions, sharp face, cinematic lighting, smooth movement, high detail, clean background, steady camera, no distortion.
Template 2: Anime performance
Anime-style character mimicking the reference motion, crisp linework, consistent face, smooth animation, studio lighting, stable anatomy, no jitter, high clarity.
Template 3: Mascot promo
Brand mascot character following the reference motion, bright studio set, friendly energy, consistent identity, smooth limbs, clean edges, sharp details.
Prompt mistakes to avoid
- Don’t describe new choreography (“do a backflip”) if your reference doesn’t do that.
- Don’t overload with conflicting styles.
- Don’t forget camera framing—full body vs portrait matters.
Wan 2.2 Animate workflow: animate vs replace
The most important decision in Wan is: are you animating a character, or replacing a character in a shot?
Here’s the hub link you’ll want nearby: Wan 2.2 Animate Workflow.
Wan Animate mode (best for “make my character perform”)
If you’re starting from a reference clip and want your character to “perform” it, you’re effectively in Animate mode.
Use it when:
- You’re creating a new clip
- The background can be more flexible
- The main priority is your character’s performance
For a step-by-step walkthrough, this Wan Animate Mode Tutorial continues right here—using the same workflow and examples outlined below.
Quick recipe:
- Choose a performer clip with clear poses
- Upload your target character image
- Prompt for style + identity stability
- Start short, iterate, then extend
Wan Replace mode (best for “swap the actor, keep the shot”)
This is where Wan tends to stand out: replacement-style outputs.
Use it when:
- You want the same scene, same camera, same shot structure
- You want to change who is in the scene
Follow the full tutorial hub here: Wan 2.2 Animate Replace Tutorial.
Quick recipe:
- Pick a clip where the subject is clearly visible
- Choose a character image with similar silhouette/pose readability
- Prompt for “match lighting / match perspective / preserve background”
- Run a short test segment first
Real scenario walkthrough: replace an actor in the video with an AI character (Wan)
If your goal is literally “swap the person,” this is the cleanest mental model:
- Start with a clip that has a readable subject
- Use a character image that matches the subject’s rough proportions
- Use Replace mode
- Prompt to preserve the scene
And yes, this exact use case is common enough to deserve the keyword as written: Replace an Actor in the Video With an AI Character (Wan).
A prompt that usually behaves well:
Replace the actor with the provided character while preserving the original background, camera motion, lighting direction, and scene realism. Keep proportions stable, avoid warping, maintain consistent face and outfit.
Troubleshooting: fix the 6 most common failures fast
1) The motion looks floaty or rubbery
- Pick a cleaner reference clip (less occlusion, less fast camera)
- Shorten the segment
2) The face changes every few frames
- Use a sharper, front-facing image
- Reinforce identity in prompt (consistent face, stable features)
3) Hands and feet distort
- Avoid extreme limb occlusion in the reference
- Prefer medium motion over frantic motion
4) Background warps
- Use simpler scenes
- For replacement tasks, Wan tends to hold scene continuity better
5) Character drifts off-frame
- Mention camera framing: “full-body centered, steady camera”
6) Output feels low-detail
- Iterate at low resolution, then rerun at a higher resolution once the motion and identity are right
FAQ
Which is better for dance?
If your goal is straightforward motion mimic from a dancer clip, Kling is often the most direct.
Which is better for swapping a person in a real scene?
Wan, especially when you’re intentionally using replacement-style behavior.
Do I need long prompts?
Not necessarily. A short, clean prompt with the right framing and guardrails beats a long prompt full of contradictions.
What’s the fastest way to get good results?
Start with short clips, iterate quickly, then upscale or rerun in higher resolution once the motion and identity feel locked.
Wrap-up: your best next step
If your goal is motion transfer, start by testing Kling with one clean reference clip and a full-body character image. If your goal is replacement, start with Wan and run a short Replace-mode test before you commit to longer renders.
When you’re ready to test-drive them, start here:
- Bring your character to life with Kling Motion Control
- Swap the performer fast with Wan Animate